小程序业务场景解决方案:一次实践演示
为了提供一种有效的方法来记录、传递和应用小程序开发领域的经验和知识,我们尝试通过总结最佳实践,以帮助前端开发人员可以了解特定业务场景中最成功的方法和技术,而一个最佳实践最终对外产出的是一个完整的解决方案,其中包括:
- 用户故事
- 原型图/设计图
- 一个(及以上)对外可以给客户演示,对内可以复用、定制的页面
- 提供数据的云函数
- 解决方案文档
下面以开发小程序首页为例,就每一个部分的最佳实践进行讨论:
如何编写用户故事?
用户故事在软件开发过程中被作为描述需求的一种表达形式。为了规范用户故事的表达,便于沟通,用户故事通常的表达格式为:
作为一个<用户角色>, 我想要<完成活动>, 以便于<实现价值>。
一个完整的用户故事包含三个要素:
- 角色(who):谁要使用这个
- 活动(what):要完成什么活动
- 价值(value):为什么要这么做,这么做能带来什么价值
参考文档:
示例 1:
作为一个潜在客户, 我想要在小程序首页浏览武汉云基地在各个行业的小程序解决方案示例, 以便于我了解云基地的小程序开发实力,并将其作为决策依据之一。
示例 2:
作为普通用户,我希望可以看到本地的景区列表,以便我找到想去的景区。
如何开发一个页面?
下面演示小程序首页开发的一般流程,主要参考资料为 Thinking in React。
第一步:Mock 数据
在开发静态版本的 UI 之前,最好先设计你要向用户展示的 JSON 数据模型,理由引用自 Thinking in React:
由于您经常向用户显示 JSON 数据模型,您会发现如果您的数据模型构建正确,您的 UI(以及您的组件结构)将会很好地映射。那是因为 UI 和数据模型倾向于遵循相同的信息架构。将您的 UI 分成多个组件,其中每个组件都与您的数据模型的一部分相匹配。
例如,对于以下 UI 设计图:

对应的 JSON 数据模型可能看起来像这样:
[
  { "name": "教育行业", "link": "/domains/education" },
  { "name": "旅游行业", "link": "/domains/tour" },
  { "name": "健康医疗行业", "link": "/domains/medical" },
  { "name": "新闻行业", "link": "/domains/news" },
  { "name": "体育行业", "link": "/domains/sports" },
  { "name": "生活行业", "link": "/domains/life" },
  { "name": "金融行业", "link": "/domains/finance" },
  { "name": "跨境电商行业", "link": "/domains/e-commerce" },
  { "name": "快递行业", "link": "/domains/delivery" }
]
第二步:组件分析
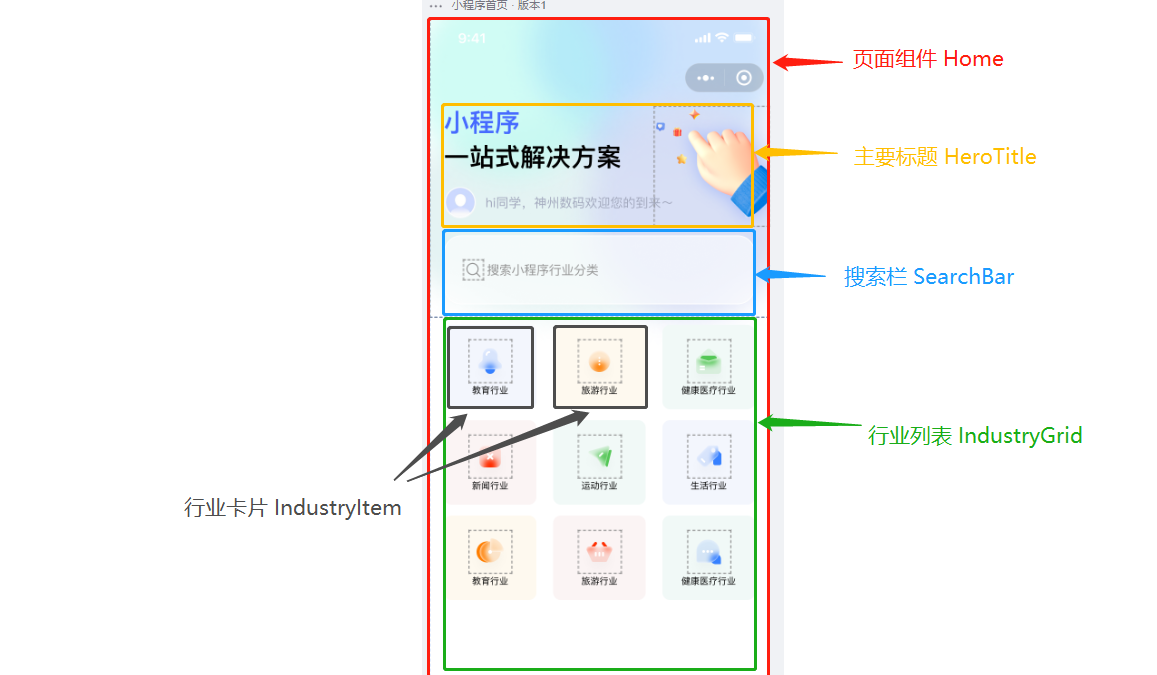
将一张完整的 UI 设计图拆分为多个组件或子组件,并在设计图上用不同颜色的方框将组件标记出来。
可以从以下角度考虑如何拆分组件:
- 编程——使用单一职责原则,也就是说,理想情况下,一个组件应该只做一件事,否则应该将其分解为更小的子组件。
- 设计——参考设计师在设计工具中对图层的命名和组织方式来拆分组件。
以小程序主页举例,可以将 UI 图拆分为以下 5 个组件:

- Home(红色)包含了整个首页。
- HeroTitle(黄色)显示主标题和欢迎语。
- SearchBar(蓝色)接收用户输入。
- IndustryGrid(绿色)根据用户输入显示过滤后的行业卡片。
- IndustryItem(灰色)为每个行业显示一个可点击的卡片。
接下来,将组件之间的包含关系在层次结构中体现出来:
- Home
- HeroTitle
- SearchBar
- IndustryGrid
- IndustryItem
第三步:静态还原
做静态还原时,页面的输入是在 第一步 设计好的 JSON 数据模型,输出是 UI,组件不需要添加任何交互性。
根据 第二步 分析出的组件层次结构,你既可以从较高的组件开始”自上而下“进行构建,也可以从较低的组件开始”自下而上“进行构建。
在更简单的示例中,自上而下通常更容易,而在较大的项目中,自下而上更容易。
下面演示“自上而下”的实现:
- Home 组件
.wxml:<view class="home" style="padding-top: {{statusBarHeight}}rpx;"> <view class="home__content"> <hero-title /> <search-bar /> <industry-grid industries="{{industries}}" /> </view> </view>.js:Component({ properties: { industries: { type: Array, value: [], }, }, data: { // 自定义导航栏用,状态栏高度,单位 rpx statusBarHeight: 0, }, lifetimes: { attached: function () { wx.getSystemInfo({ success: (res) => { // wx API 返回的 pixelRatio 不准确,自己算 const pixelRatio = 750 / res.windowWidth; // wx API 返回的 statusBarHeight 单位为 px,转 rpx const statusBarHeight = res.statusBarHeight * pixelRatio; this.setData({ statusBarHeight, }); }, }); }, }, });
提示
了解更多:定制微信小程序导航栏样式
- HeroTitle 组件
.wxml:<wxs src="../../../../wxs/bem.wxs" module="bem"></wxs> <view class="hero-title"> <view class="{{bem('hero-title__text','primary')}}"> <text>小程序</text> </view> <view class="hero-title__text"> <text>一站式解决方案</text> </view> <view class="hero-title__welcome"> <text>hi同学,神州数码欢迎您的到来~</text> </view> </view>
- SearchBar 组件
.wxml:<view class="search-bar" bind:tap="tap"> <view class="search-bar__field"> <input focus="{{focus}}" placeholder="搜索小程序行业分类" placeholder-class="search-bar__placeholder" confirm-type="search" /> </view> </view>.js:Component({ data: { focus: false, }, methods: { tap() { this.setData({ focus: true, }); }, }, });
- IndustryGrid 组件
.wxml:<view class="industry-grid"> <industry-item wx:for="{{industries}}" wx:key="name" industry="{{item}}" /> </view>.js:Component({ properties: { industries: { type: Array, value: [], }, }, });
- IndustryItem 组件
.wxml:<wxs src="./index.wxs" module="computed" /> <view class="{{ computed.itemClass({ industry, cardStyles }) }}"> <image src="{{ computed.imageSrc({ industry, cardStyles }) }}" class="industry-item__icon" /> <text class="industry-item__text">{{industry.name}}</text> </view>.wxs:var bem = require('../../../../wxs/bem.wxs'); function itemClass(data) { if (data.industry && data.cardStyles[data.industry.name]) return bem('industry-item', data.cardStyles[data.industry.name].modifier); return ''; } function imageSrc(data) { if (data.industry && data.cardStyles[data.industry.name]) return data.cardStyles[data.industry.name].iconUrl; return ''; } module.exports = { itemClass: itemClass, imageSrc: imageSrc, };.js:Component({ properties: { industry: { type: Object, }, }, data: { cardStyles: { 教育行业: { modifier: 'blue', iconUrl: 'https://636c-cloud1......', }, // ...... }, }, });
第四步:状态设计及单向数据流
如何找到组件 UI 所需状态的最小化表示?
- 整理静态还原阶段的所有数据
- 使用以下原则判断其是否为状态:
- 它会随着时间的推移保持不变吗?如果是这样,它不是状态。
- 它是通过组件属性从父组件传来的吗?如果是这样,它不是状态。
- 您可以根据组件中的现有状态或属性来计算它吗?如果是这样,那肯定不是状态!
- 第三步 的所有数据如下:
- 行业列表
- 搜索栏的值
- 搜索结果列表
- 判断是否为状态:
- 行业列表是 Home 组件的参数,所以它不是状态
- 搜索栏的值是状态,因为它会随着时间的推移而变化,并且无法从任何东西中计算出来
- 搜索结果列表不是状态,因为它可以通过行业列表和搜索栏的值计算出来
所以得到结论:
只有搜索栏的值是状态。
如何确定状态应该放到组件树的哪个位置?
- 识别基于该状态呈现某些内容的每个组件。
- 找到它们最接近的公共父组件。
- 决定状态放到哪:
- 通常,您可以将状态直接放入它们的共同父级中。
- 您还可以将状态放入其共同父级之上的某个组件中。
- 如果您找不到任何一个的组件适合存放状态,请创建一个新组件专门用于保存状态并将其添加到公共父组件之上的层次结构中的某个位置。
- 对于搜索栏的值:
- SearchBar 组件需要显示该状态
- IndustryGrid 组件需要根据该状态过滤行业列表
- 找到最近的公共父组件:Home 组件
- 将状态放到 Home 组件 中
示例代码如下:
- Home 组件
.js:Component({ data: { // 自定义导航栏用,状态栏高度,单位 rpx statusBarHeight: 0, // 接收用户输入的行业关键字 searchBarText: '' },.wxml:<view class="home" style="padding-top: {{statusBarHeight}}rpx;"> <view class="home__content"> <hero-title /> <search-bar value="{{searchBarText}}"/> <industry-grid industries="{{industries}}" keyword="{{searchBarText}}" /> </view> </view>
- SearchBar 组件
.js:Component({ properties: { value: { type: String, value: '' } }, }).wxml:<view class="search-bar" bind:tap="tap"> <view class="search-bar__field"> <input value="{{value}}" focus="{{focus}}" placeholder="搜索小程序行业分类" placeholder-class="search-bar__placeholder" confirm-type="search" /> </view> </view>
- IndustryGrid 组件
.js:Component({ properties: { industries: { type: Array, value: [], }, keyword: { type: String, value: '' } }, }).wxs:function filteredIndustries(data) { return data.industries.filter(function (item) { return ~item.name.toLowerCase().indexOf(data.keyword.toLowerCase()); }); } module.exports = { filteredIndustries: filteredIndustries, };.wxml:<wxs src="./index.wxs" module="computed" /> <view class="industry-grid"> <industry-item wx:for="{{ computed.filteredIndustries({ industries, keyword }) }}" wx:key="name" industry="{{item}}" /> </view>
第五步:添加方向数据流
现在,Home 组件可以正确呈现自上而下流动的数据流,接下来要添加反向数据流以响应用户输入:
- Home 组件
.wxml:<view class="home" style="padding-top: {{statusBarHeight}}rpx;"> <view class="home__content"> <hero-title /> <search-bar value="{{searchBarText}}" bind:search="search" /> <industry-grid industries="{{industries}}" keyword="{{searchBarText}}" /> </view> </view>.js:Component({ methods: { search: function (event) { this.setData({ searchBarText: event.detail }) } } })
- SearchBar 组件
.wxml:<view class="search-bar" bind:tap="tap"> <view class="search-bar__field"> <input value="{{value}}" focus="{{focus}}" bind:confirm="confirm" placeholder="搜索小程序行业分类" placeholder-class="search-bar__placeholder" confirm-type="search" /> </view> </view>.js:Component({ methods: { confirm(event) { this.triggerEvent('search', event.detail.value) } } })
至此,在不对接后端服务的情况下,一个完整页面的开发工作已经完成,下面介绍如何使用云函数提供 mock API。
Source · Demo
- Source:GitHub
- Demo:

如何开发云函数?
待补充